Click to show/hide contact information.

DocuSign in Financial Affairs

​​​​​​​​​​

financial Affairs DocuSign Accounts

This information was adapted from the ​​​​​​main ITS DocuSign resource, to provide more specific detail on using DocuSign with Financial Affairs forms. DocuSign is a self-service tool that allows members of the campus to create and route electronic documents for signatures. All DocuSign forms sent to recipients with an @ucsc.edu email address will require the user to login with their CruzID Gold credentials.

Please use the following accounts as recipients when submitting DocuSign documents or envelopes to specific offices within Financial Affairs:

Contact finaff-tech@ucsc.edu for information about submitting DocuSign forms to a Financial Affairs office not listed above.


Financial Affairs DocuSign Methods

Sign a Document
  • Upload completed documents
  • Single signer
  • Single recipient
Send an Envelope
  • Upload completed documents
  • One or more signers
  • Multiple recipients
DocuSign PowerForms
  • Fill document(s) in DocuSign
  • Pre-Defined signers
  • Pre-Defined recipients
Custom Web Forms
  • Guided web form experience
  • Multiple signers
  • Dynamic recipients
Signing and Submitting Basic Forms and Documents
This is the simplest method for leveraging DocuSign to sign and submit a form to one of our Financial Affairs offices. The Sign and Submit feature provides for the uploading of one or more documents, that require no more than one signature per document, as well as for the subsequent submitting of those documents to a single valid UCSC email address (Google groups and aliases will not work in DocuSign).

This method works well when:
  • A Financial Affairs form (e.g. PDF) has already been filled out and simply requires a valid electronic signature.
  • A valid address for the receiving office is known.
This method does not work well if:
  • The form requires multiple recipients and/or signatures.
  • Not all of the required documents are complete or in possession at the time of signing/sending.

Logging in to DocuSign
To upload and sign a document for distribution to Financial Affairs, begin by logging in to DocuSign.


Uploading a document to DocuSign
In order to sign and submit a document, it (and any accompanying attachments) must first be uploaded to DocuSign. This action generates what DocuSign refers to as an "envelope" which will contain the uploaded documents as well as the recipient information and signing certificate data for future validation.
  1. Click NEW and select Sign a Document.
  2. In the resulting dialog box, click "Upload" to select a document to add to the envelope.
    • Continue to upload any additional documents or attachments that should be included in this envelope for submission.
  3. When finished uploading documents, click Sign to continue.
  4. On the next page click Continue to begin placing tags, such as a signature, onto the document(s) that were uploaded.

Signing and adding tags to a document
DocuSign is primarily used when a signature is required on a given document. It is possible to leverage DocuSign for submitting documents that do not require a signature, though the system will still require either a signature or initials to be placed on a document within the envelope before it can be submitted.
  1. Once in the signing interface, click and drag the "Signature" or "Initials" field to the appropriate place on the uploaded document(s) within the envelope.
    • Note: A signature or initials must be placed on a document within the envelope in order to activate the "Finish" button.
  2. The signing interface also provides the option to Zoom or rotate the document, as well as print or download.
    • Select the "?" for help directly through DocuSign (including videos and additional documentation).
  3. When done adding signature or initial tags to the documents within the envelope, select "Finish" to proceed.

Submitting the document(s) to Financial Affairs
Once "Finish" has been clicked, a resulting dialog box will appear where the recipients of the document can be specified.
  1. Provide a Full Name for the recipient (e.g. FAR Office) and one of the Financial Affairs DocuSign email addresses listed above. These email addresses begin with "fads". DO NOT use Google groups such as aphelp or finpolicy, because no one will receive your document(s).
  2. The Add Recipient feature allows additional individuals (e.g. supervisors or specific department contacts) to be CC'd when submitting document(s).
    • Each recipient will receive an email and will be allowed to review or download the completed envelope from DocuSign.
  3. By default the Subject will populate with the name of the uploaded file(s). Please change the Subject so that it contains the primary form name and the full name of the form requestor (i.e. Direct Payment for Sammy Slug).
  4. A brief (250 character) optional message can also be included with the envelope submission.
  5. When the above steps have been completed, review the recipient information, then select "SEND AND CLOSE". The document will be routed to the Financial Affairs Office specified for processing.

Downloading a signed document
The signed document can be downloaded from the Manage tab within the DocuSign interface.
  1. Select the Inbox from the list of folders in the left pane.
  2. Locate and click on the subject of the desired envelope.
  3. Use the download or print icons to obtain a copy of the document(s) within the envelope.
    • Note: While printing to PDF may be sufficient for basic records, downloading the file(s) is the preferred method so that signature validation remains intact.
    • After clicking the "Download" icon, select "Combine all PDFs into one file" to obtain a single PDF rather than the default ZIP archive of the envelope contents.
Using Envelopes for Multiple Signatures/Recipients
This is the simplest method for leveraging DocuSign to sign and submit a form to one of our Financial Affairs offices. The Sign and Submit feature provides for the uploading of one or more documents, that require no more than one signature per document, as well as for the subsequent submitting of those documents to a single valid UCSC email address (Google groups and aliases will not work in DocuSign).

This method works well when:
  • A Financial Affairs form or set of forms have already been filled out and now require multiple valid electronic signatures.
  • A valid address for each recipient/signer as well as the final receiving office is known.
  • Additional documents will need to be attached by subsequent recipients.
This method does not work well if:
  • Only a single signature is required on each document.
  • A Financial Affairs office is the only intended recipient.

Logging in to DocuSign
To upload and sign a form/document for distribution to Financial Affairs, begin by logging in to DocuSign using CruzID Gold credentials.

Uploading a Document or Set of Documents to DocuSign
  • 1) Click the "New" button and select "Send an Envelope".
  • 2) Click the "Upload" button and select the document to upload.
  • 3) Additional documents can also be included at this stage by selecting “Upload” again to add additional documents to the envelope.

Adding Recipients to review/sign/receive the Documents within the Envelope
  • 1) Scroll down to the “Add Recipients to the Envelope” section, and check the "Set Signing Order" checkbox.
  • 2) First Recipient: Enter the full name and email address of the 1st recipient in the Name and Email fields. This will be the first person to sign the document.
  • 3) Second Recipient: Click “Add Recipient” to generate a second set of Name and Email fields. Enter the full name and email address of the next recipient. This will be the second person to review and/or sign the document.

  • 3b) Additional Recipients: Repeat step 3 above to add additional recipients to the envelope.
  • 4) Final Recipient: Click "Add Recipient" again to generate a final set of Name and Email fields for the receiving office. This will route the document to the appropriate Financial Affairs Office, as outlined at the top of this page, once all other signatures are complete. For example:
    1. Name: Pro-Card Office
    2. Email: fadspcrd@ucsc.edu
    Note: An approved email address must be used at this stage, as Google groups (mailing lists) and aliases will not work in DocuSign.
    Example of Adding Recipients

Specifying the Email Subject Line
Scroll down to the “Message to All Recipients” section and fill in the Email Subject (required) and Email Message (optional)
  1. [Primary Form Name] for [FirstName LastName]
  2. Example Subject Line
Click the gold "Next" button when ready to proceed.

Placing Signature Fields on the Document
The "Standard Fields" left-side toolbar has drag-and-drop elements that can be placed anywhere on the document.
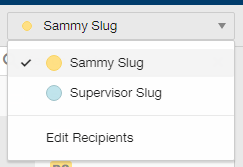
  • 1) On the upper left of the screen is a drop-down list that contains the recipients of the document. The Standard Fields toolbar underneath contains fields for Signature and Date Signed that need to be moved onto the envelope documents for each recipient where a signature is desired/required.
  • 2) Grab the "Signature" and "Date Signed" fields and drag them into their desired locations for the target recipient.
  • 3) Select additional recipients from the pick list and drag the "Signature" and "Date Signed" fields into their desired locations.

  • 4) [OPTIONAL] Select the target Financial Affairs office role and drag the "initial" and "date signed" fields onto the bottom of the primary form in the envelope.
  • 5) Important: Before sending, double check that the colors of the assigned signature and date fields are matching the colored dots next to the recipients in the pick list.

    Click the gold "Send" button to submit the envelope for signatures.
Leveraging Pre-Defined Templates to Complete Required and/or Recurring Processes Through DocuSign PowerForms
This method can be used with templates built in Financial Affairs to address fixed, required, and recurring business processes that do not have a great deal of complexity behind them. These templates can be adapted to support multiple signing parties and recipients with custom workflow, requiring very little input from the user. PowerForms can also be extended to users outside of the UCSC community (e.g. suppliers, vendors, colleagues, etc.).

This method works well when:
  • A Financial Affairs form must be filled out and routed to multiple parties for approval and/or signature.
  • The routing, destination, and general business process behind the form are not always known to the user at the time the form is being filled.
This method does not work well if:
  • The form relies upon highly dynamic content or complex logic and can result in various additional fields/sections that are then required to be filled.

Current examples of Financial Affairs PowerForms include:
Completing Guided Web Forms to Address Complex, Dynamic Business Processes
This method is used when PDFs and PowerForms are not enough to satisfy the complex requirements of a given Financial Affairs business process. The guided web form experience allows our department to cater the form filling experience to particular situations and user groups. Web forms are able to draw on external data sources to further simplify and tailor the filling of the form based on a user's relationship to those external variables. The custom DocuSign API integration behind the web forms allows for information provided in the web form to be used to generate a DocuSign envelope dynamically on the user's behalf. Workflow routing, based on signer/recipient information, will be determined by the input provided in the web form and implemented at the time the DocuSign envelope is created.

This method works well when:
  • A basic PDF cannot effectively capture all required input in a clear and concise manner.
  • The required input, routing, destination, and general business process behind the form are potentially different for each user of the form.
This method does not work well if:
  • The form and business process can be addressed by one of the simpler mechanisms available through DocuSign.

Current examples of Financial Affairs Custom Web Forms include: