Click to show/hide contact information.

Loading...

CruzBuy Quick Guides

This quick reference guide provides information about performing basic functions in CruzBuy. For information on setting up a CruzBuy account, see the CruzBuy Account Management Guide
Expand or contract all step headings
printer
printer
increase font size Decrease Font Size


 magnifying glassDelete Circle
  • CruzBuy Guided Buying Experience Demo

    We are excited to announce that on November 6, 2023, CruzBuy will roll out a new landing page called Guided Buying. Guided Buying will introduce dedicated dashboards separated by commodity and is tailored to guide new users on how to purchase and whom to purchase from. Additionally, it will offer all users guidance on frequently misunderstood or complex procurement policies and processes.

    The eProcurement team recorded demo videos to provide a first look at the Guided Buying experience:


    Back to Top
  • Shopping Options

    CruzBuy’s landing page, Guided Buying, contains dedicated commodity dashboards and information to guide users to suppliers that the University has negotiated contract pricing with, and source purchases.


    Upon clicking on a commodity dashboard, shopping options include related Catalogs, PunchOuts, and Forms.


    To view other commodity dashboards click on the associated tab at the top ribbon.


    Accessing additional tabs may require scrolling, left or right on the top ribbon.


    To return to the main landing page click the Home Icon in the upper left.


    There are three ways to order products or services in CruzBuy: Hosted Catalogs, PunchOut Catalogs, and Forms. Order methods will differ depending on the commodity dashboard.

    Hosted Catalogs:

    1. Hosted Catalogs are supplier catalogs loaded into CruzBuy. Users can search all Hosted Catalogs with the Product Search - Supplier Catalogs search bar at the top of the page. Users may also search specific hosted catalogs by clicking on the supplier tile with the caption “Hosted Catalog” underneath.


    1. Find the desired product, enter Qty, and Add to Cart.
    2. Shop for any additional items as needed.

    PunchOut:

    1. A PunchOut catalog is a mechanism that allows a requester to access a supplier's website. All PunchOut suppliers have the caption “PunchOut” on their supplier tile.


    2. Shop on the supplier's site and add items to your cart.
    3. When finished, go through the supplier's checkout process. Once complete, the product(s) will transfer back to CruzBuy.

    CruzBuy Forms:

    1. CruzBuy forms a for products not available through the catalogs or to purchase services and are available on individual commodity dashboards.

      Another option to access Forms is the Left Navigation area: Shop > Shopping > View Forms.

    2. Click the appropriate form.
    3. Enter all applicable information on the form. Form fields on the form are required.
      Hint: If catalog number field is not applicable, use 'NA'
    4. Select Add and Go to Cart from the top of the form to go directly to checkout or Add to Cart if there are multiple items to be ordered from the same supplier.
      Hint: Your cart can contain a mix of Hosted, Punch-out items, and certain Forms.
    ​​
    ​​​​​​​
    Back to Top
  • CruzBuy Forms

    When a user clicks on a CruzBuy form, the application will load the form in the same window/tab.

    • Closing the tab or window will close CruzBuy. To close the form, but remain in CruzBuy, click the Close button on the upper right-hand side of the screen.
    • Click the down arrow icon to view the Available Action drop-down menu on the upper right-hand side of the screen.
    • To add a form to favorites, click on the heart icon.
    • To enter a new supplier, click Enter Manually.
    • Questions marked with an asterisk (*) are required fields.

    Back to Top
  • How to Onboard a CruzBuy Supplier

    CruzBuy (PO) suppliers only - Onboarding Steps

    • CruzBuy requester verifies the proposed supplier accepts purchase orders.
    • CruzBuy requester manually enters the supplier using the appropriate form.
    • eProcurement office receives a notification about the manually entered supplier.
    • The supplier is sent an email invitation to join UC Santa Cruz’s network in PaymentWorks.
    • The supplier signs up for an account with PaymentWorks.
    • The supplier completes and submits the New Vendor Registration in PaymentWorks.
    • PaymentWorks completes the validation process.
    • Once validation is complete, UCSC supplier administrators enter the supplier data into the Supplier Database.
    • eProcurement notifies the buyer working on the requisition the supplier is available.

    Non-CruzBuy “suppliers” will continue to use the Payee Setup 204 form.

    • Direct-Pay suppliers
    • Faculty
    • Staff
    • Student
    • Visitors receiving reimbursement or other one payments

    Back to Top
  • Proceed to Checkout

    Proceed to check out by clicking on the shopping cart on the Top Action Banner.


    Checkout:

    1. The application will display a warning if the requisition is missing any required information. The submit button will not appear until the user resolves the issue(s).


    Hint: How to Set up Profile (See the Profile Section in the CruzBuy User Guide)

    1. Review the order for any errors. Click the Submit button to begin the workflow approval process.

    Back to Top
  • Track Your Order

    1. To track the order’s status, look for Workflow, located on the right-hand side of the requisition.


    2. On the Workflow section, click on the blue text to see who can approve the workflow step.


    3. Upon completing the requisition workflow, CruzBuy will issue and send a purchase Order to the supplier unless otherwise indicated. The purchase order number is located below.
    4. Supplier Details. All CruzBuy purchase orders begin with the letter "P" and the number "0".


    5. To check the status of your order, please email or call the supplier with your purchase order number.

    Back to Top
  • FAQ

    Additional resources are available on the Procurement Services website. For more detailed instructions on how to use CruzBuy please visit the CruzBuy User Guide.

    ​​
    Back to Top
  • My Approval and Available Actions

    Below is information on requisition approvals. Approvals provide the opportunity to review a requisition for accuracy prior to the creation of the Purchase Order. Approvers also have a number of available actions in addition to approving (such as Return, Place on Hold, Forward, etc.).

    1. Clicking on the “*My CruzBuy” tab the “Action Items” widget is displayed.


    2. “Action Items” provides easy access to both “My Assigned Approvals” and “Unassigned Approvals”.


    3. Clicking on either “My Assigned Approvals” or “Unassigned Approvals” displays approval folders containing requisitions. Approvers can expand a particular folder or all folders assigned to them by clicking on the eye icon on the upper right-hand side of the screen. CruzBuy defaults to 20 requisitions per folder. However, approvers may change the number of requisitions displayed.


    4. Unassigned Approvals: Approvers may assign themselves a single requisition by clicking the person icon on the right.


    5. Approvers may also assign multiple requisitions to themselves at once by clicking on the checkboxes on the left and selecting “Assign” from the drop-down menu at the bottom of the screen.


    6. Once assigned, the requisition will display in the approver's "My PR Approvals" folder.


    7. Click on the requisition number to review details of the order. Approvers may modify some elements of the document.
    8. After reviewing the requisition, Approvers may take several available actions. Select one of the available actions from the drop-down menu.


    9. The Orders icon on the left navigation can also be used to locate folders containing requisitions pending approval. Go to the Left Navigation Bar, Orders icon, Approvals, and click on Requisitions to Approve.


    Back to Top
  • FAQ

    Additional resources are available on the Procurement Services web page. For more detailed instructions on how to use CruzBuy please visit the CruzBuy User Guide.


    Back to Top
  • Document Search

    CruzBuy has Elastic Search functionality for document searches. Elastic Search provides users with more configuration options in how searches are conducted and results are presented. Some of the benefits of Elastic Search are:

    • Each user has the ability to search and save queries.
    • Each user can pin filters and columns to create consistent searches with the same filters and layout.
    • Searches now allow operators to be used to fine-tune searches.
    • Search results are immediately presented when a selection is made.

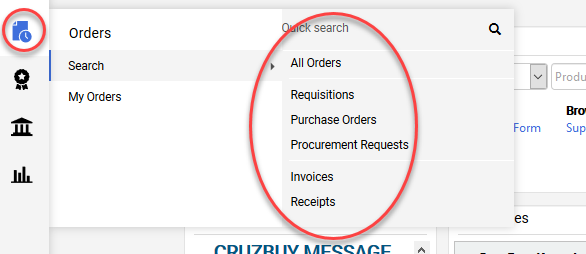
    To access the CruzBuy Elastic Search, click on the search icon and select the document type to be searched:


    DATE RANGE

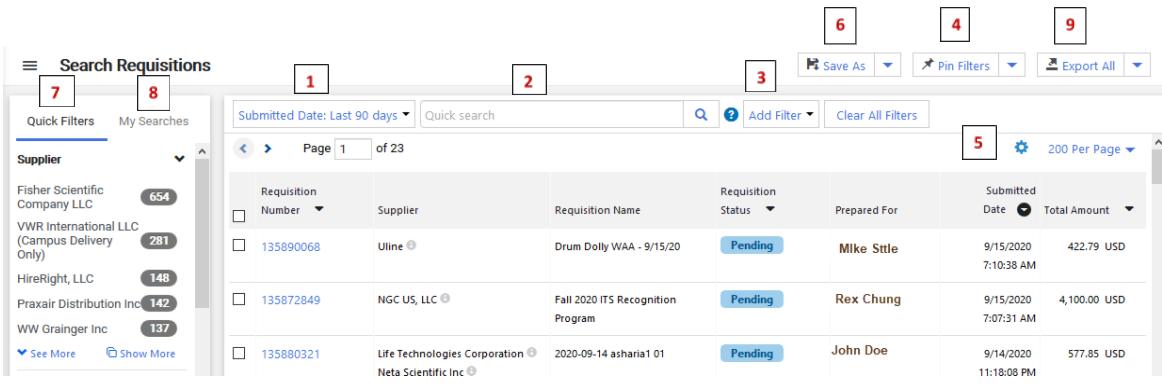
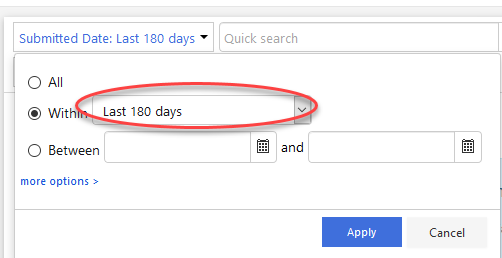
    The results presented will default for the last 90 days. To change the date range, click on the next to “Submitted Date Last 90 days”:

    This will present a window providing date filtering options:

    Tip: You can change the date, pin the filters4and make your preferred date range the default. Once a different date parameter is selected and pinned, every search for that specific document type (requisition/PO/invoice) will default to that pinned date parameter.

    PERFORM A QUICK SEARCH2

    To learn more about Quick Search options, select the help icon next to the search box.

    • Enter a keyword or phrase in the Quick search field.
    • Click the search icon. Matching documents are returned in the search results.

    Quick search - Provides a faster way to perform some searches. The different options to refine your search are:

    • Combine Searches - Use "OR" between each search. For example, 12389 OR 83827
    • Search for a Phrase Match - Put a phrase inside quotes. For example, "Fisher Scientific"
    • Exclude Words from a search - Put a - in front of a word to exclude it. For example, John –Johnson
    • Search for Wildcards - Put an * in your word as a placeholder. For example, 123*98
    • Search for Place Holder - Put one or more ? as a placeholder. For example, 1234??6
      • Searchable Data: CAS Number, Catalog Number (SKU), Contract Number, Ext. Requisition Number, Invoice Name, Invoice Number(s), Manufacturer Name, PO Number, Packing Slip Number(s), Participant, Product Description, Receipt Name, Receipt Number, Requisition Number, Supplier, Supplier Invoice Number(s), Tracking Number(s)

    PERFORM AN ADVANCED SEARCH3

    Use the filter options to perform a more specific search. To choose a different date range, click the Created Date: Last 90 days drop down button1and select another date option.

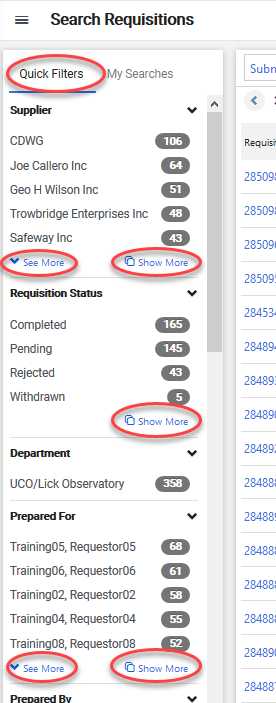
    Add filters by selecting from the Add Filter button next to the Quick Search box 3 or by selecting from the Quick Filters tab to the left of search results.

    USING THE ADD FILTER BUTTON3

    Click the Add Filter button (located to the right of the Quick search field). A list of available filters will display. Simply check the desired filters. Note: These filter options are the same options available on the previous Advanced Search page.

    Quick Filters7 – Allows users to filter on specific criteria once search results appear. Clicking on a specific supplier, for example, will bring up documents related only with that supplier. Clicking on “See More” will expand the visible list to the top 10 results. However, only one element can be filtered per category. Clicking on “Show More” will present a window containing checkboxes next to all unfiltered results for that category. Check the box next to the item you want to use for filtering the results. Multiple checkboxes can be selected for each category.

    Expand/Collapse button - Select to view the Quick Filters and Saved Searches panels on the left. Select again to hide the filters.

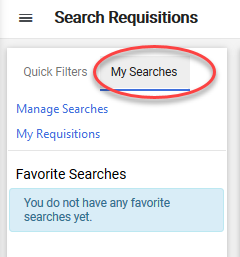
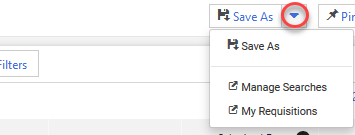
    8You can choose to manage searches and navigate to your own documents and approvals from the My Searches tab on the left. However with this release, the Save As button dropdown6now contains these options as well, so you do not have to expand the left panel to access them:

    • Manage Searches
    • My [Document type]
    • My Recent Approvals

    8

    or:6

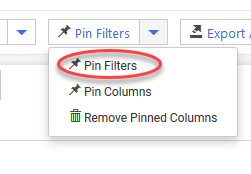
    4The Pin Filters button contains the options to Pin Filters and Pin Columns. This action is recommended when you use the same filters and column layout for searches, so you do not have to reapply filters and rearrange columns each time.


    Once pinned, the date range will default to the new date range every time that specific document type is searched (requisition, purchase order or invoice).

    5Configure Columns – Allows users to select the columns to display and the order in which they appear in results.

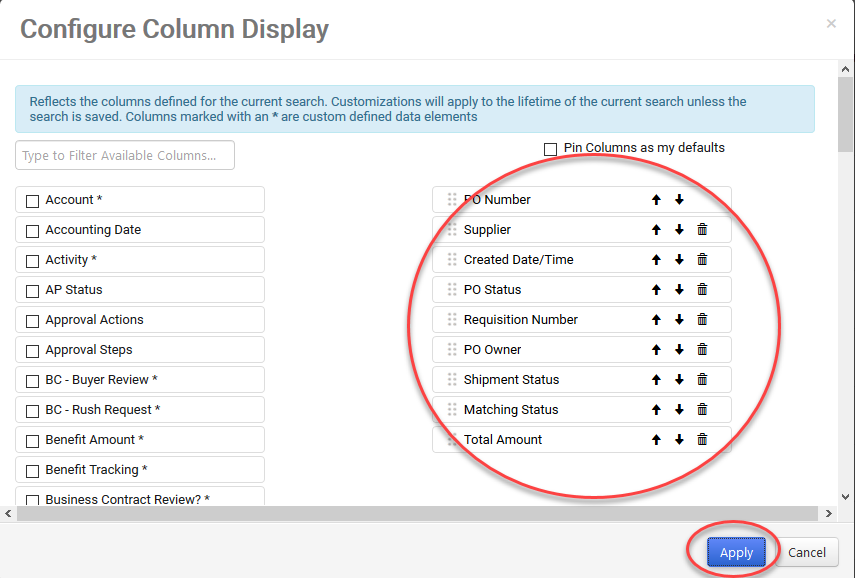
    In addition to selecting the columns and order in which to display, additional data filters are available on the left. Put a check in the box next to the filter you wish to apply to your report. Once selected, the filter will appear on the column order selection, where they can be reordered.

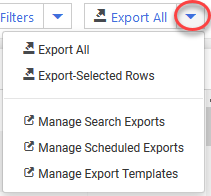
    9If you have the permission, you can choose to Export All or Export Selected Rows, as well as manage search exports, scheduled exports, and export templates.


    Back to Top
  • Requisition Workflow

    The workflow is on the right-hand side of the requisition document. The workflow lets users know what approval steps are needed and who can approve.

    Users can find out who is authorized to approve their requisitions by clicking on the workflow step with blue text. If an approver has assigned the requisition, that person’s name will appear below the workflow step.


    Back to Top
  • Document History

    CruzBuy records all actions taken on a document. To view these actions, click on the History link for that document.

    By default, document history is sorted chronologically from newest to oldest. Users may need to increase the results-per-page to see the entire document history or page through one at a time.

    ​​​
    Back to Top
  • Locating and Printing a PO

    After a requisition completes the workflow process, CruzBuy will generate a purchase order number and send a copy of the order to the supplier unless indicated otherwise.

    All CruzBuy purchase orders begin with the letter “P” and the number “0.” The purchase order number is located underneath the Supplier Detail section or under Related Documents.

    To print a copy of the purchase order, click on the purchase order number. In the new screen, under the drop-down menu, select “Print Fax Version.”

    ​​​
    Back to Top
  • Requisition Turnaround Time

    PSCS has established the following approximate number of business days it will take to complete a requisition. Turnaround time begins once org approval of the CruzBuy requisition has been obtained and ends when the Buyer finalizes the Purchase Order. To help ensure your purchase orders are placed in a timely fashion, make sure all requisitions are on the proper form and include all required information and documentation. If you have any questions about which form to use or other requirements, please contact buy4me@ucsc.edu.
    Missing information/documentation may result in processing delays.

    PSCS Turnaround Time:
    • Non-Catalog Goods– 5 days
    • Change Order – 5 days
    • Food and Entertainment - 5 days
    • Blanket Orders - 5 days
    • Temporary Staffing Request- 5 days
    • Vehicle Rental/Charter- 7 Days
    • Hazardous Materials - 5 days
    • DEA Controlled Substances – 7 days
    • Service Order Request – 10 Days
    • After-the-Fact – 5 days
    • Off-Campus Events/Facility Rental – 10 days
    • Independent Contractor/Consultant/Professional Services – 20 days

    Exceptions that may take longer to process can include but aren’t limited to the following:
    • HIPAA / Data Security / PCI related orders (SaaS, Cloud Services)
    • Prevailing Wage related orders
    • Orders subject to contracting out for covered services
    • Orders > $100k triggering a competitive solicitation (RFx) or Source Selection Price Reasonableness form.
    • DEA scheduled drugs requiring the Form 222
    • Declared conflicts of Interest / EVRD review
    • Requests that contain supplier terms and conditions
    • Supplier delays in responsiveness to contract negotiations
    • Successor Contracting Review
    • Orders requiring Certificate of Insurance
    • Federally Funded orders
    • Export Control orders
    • Unapproved Caterers and Charters
    • Orders submitted during fiscal close and start
    • Requisitions requiring new supplier onboarding

    *** During fiscal year close, standard turnaround times may be delayed by several days or possibly weeks based on the complexity of the order. Please plan accordingly and allow sufficient time for processing***

    Expediting an order:
    In the event your order requires expedited handling please send a CruzBuy comment to rush_cruzbuy@ucsc.edu once org approval has been obtained, stating the reason for the rush and the need by date. Rush requests will be evaluated on a case by case basis depending on factors as emergency need and risk to the University. Urgent requisitions will be reviewed and assigned to a Buyer within 2-3 business days of receiving notice. While we will endeavor to process your request as quickly as possible, we hope you understand that not all such requests can be expedited.

    Back to Top
  • FAQ

    Additional resources are available on the Procurement Services web page. For more detailed instructions on how to use CruzBuy please visit the CruzBuy User Guide.


    Back to Top
  • Set Up Your Profile

    To access your profile, click on the person icon on the Top Action Banner, then “View My Profile.”


    1. On the new screen, click on “User’s Name, Phone Number, Email, etc.” under User Information and Settings.


    2. Confirm your Name, Phone Number, Email, and Division, then click “Save”.


    3. To edit Notification Preferences, select one of the categories available.


      eProcurement recommends Requesters enable the following notifications:
      • Shopping, Carts & Requisitions
        • PR Submitted into Workflow
        • PR Workflow complete / PO created (helpful for change orders)
        • PR Line Item(s) rejected
        • Cart/PR rejected/returned
      • Purchase Orders
        • PO Workflow complete (enabled by default - helpful for walk-in purchase orders)
        • PO Sent to supplier
      eProcurement recommends Approvers enable the following notification:
      • Shopping, Carts & Requisitions
        • PR Pending Workflow Approval
    4. To add a Custom Fields and Accounting Code Defaults, or Default Address, click on “Custom Field and Accounting Code Defaults” or “Default Addresses” under Default User Settings. Note: The process for adding a custom field or an address to the profile is the same:
      • Click on the Edit button to modify an element.


      • Click Search for Value


      • Enter a Value (if known) or a Description and click "Search."


      • Put a check in the box next to the value and click "Add Values" to save.


      • A Default value will auto-populate on every requisition. Users may override the default value on the requisition before submitting. To default a value, click on the value.


      • Default checkbox and "Save."


      • How to add Code Favorites.
        Requisitioners can create commonly used accounting strings for quick access. To create a Code Favorite, click on the “Add” button.
        • Give the Code Favorite a Nickname.
        • Click the “Save” button to add to My Profile.

    ​​​
    Back to Top
  • What is PaymentWorks?
    What is Paymentworks?

    PaymentWorks is a secure third-party application used by several UC campuses to capture needed supplier information, such as diversity classifications and certificates of insurance, and validates supplier bank account numbers and Federal Employer Identification Number (FEIN).

    What are the benefits of using PaymentWorks?

    PaymentWorks will be more convenient for the companies we pay. It allows suppliers to manage their profiles through the PaymentWorks portal. It will also be more secure for UCSC, reducing the risk of payment fraud through a more sophisticated verification process conducted over a secure network connection. PaymentWorks also verifies sanctions and performs other compliance checks required for recipients of federal funding. It allows the campus to move a manual verification process to an automated platform.


    Back to Top
  • Sample PaymentWorks Invitation Email to Supplier
    ​​​​​​
    Back to Top
  • Frequently Asked Questions

    What is the main change for campus business offices with regard to PaymentWorks and CruzBuy?

    CruzBuy supplier onboarding will be handled by the eProcurement office. Requesters should continue to ask whether the supplier accepts purchase orders before submitting a requisition. The PaymentWork invite will be sent to the email provided.

    How long will it take for a supplier to be onboarded?

    One of PaymentWorks' benefits is that of automation. Onboarding time depends on several factors, the primary of which being the supplier's completion of the registration process. Onboarding delays may occur if a supplier is found to have sanctions against them or other validation obstacles. On average, we have found it is 3x faster than the Payee Setup 204 form.

    How will supplier updates and changes be managed?

    All supplier updates will be managed through PaymentWorks. Existing suppliers who wish to update their address, identity information, or ACH banking details will be instructed to do so in PaymentWorks by Financial Accounting and Reporting (FAR). Their new PaymentWork profile will then be updated in the supplier database.

    Can I fill out the PaymentWorks registration on behalf of the supplier?

    The onboarding process requires an email invitation sent directly to a supplier and for the supplier to complete and attest to their own information. It can only be done by the supplier being onboarded to certify their login/password, tax ID information, and banking/payment method.

    What about foreign suppliers?

    Any foreign supplier will also register through PaymentWorks if there is a CruzBuy requisition. There are customized fields for each country and address format.

    Will PaymentWorks be used to reimburse employees or students?

    The process for reimbursing employees and students has not changed. They will continue to use the Payee Setup 204 form.

    Will PaymentWorks be used to onboard one-time payees (Direct-Pay)?

    The process to for one-time payees has not been changed. They will continue to use the Payee Setup 204 form.

    I have suppliers who do not use email, or simply cannot complete the supplier onboarding process for whatever reason. What do I do in these cases?

    Contact Financial Accounting and Reporting (FAR) (finpolicy@ucsc.edu) for guidance if you have any suppliers who cannot complete the supplier onboarding process in PaymentWorks.

    Where do I go for help with CruzBuy supplier onboarding?

    Please email buy4me@ucsc.edu.​


    Back to Top
  • Commodities and Associated CruzBuy Forms

    ​This page lists the appropriate CruzBuy Form to request specific commodities when the item or service is not available through a CruzBuy catalog.

    Commonly Used Forms Commodities and Associated CruzBuy Forms
     

    Back to Top
  • Overview

    ​CruzBuy forms occasionally go through updates due to changes in policies and procedures, out-of-date information, and links. Users who use an "old" form will have their requisition automatically returned by the system. Requesters with Cart/PR rejected/returned notification enabled will receive the following email.

    This section provides a workaround for updating old forms to the most current version in CruzBuy. This method does not allow users to migrate information from one form type to another, such as a Food and Entertainment form to a Service Request form. Nor will this process work for forms no longer in use, such as the NON-CATALOG FORM (not to be confused with Goods Request form) and STUDENT PROGRAMMING form.


    Back to Top
  • Workaround - Updating Old Forms

    The following is an example of an outdated version of the Goods Request form.


    1. Go to the Available Actions menu either on the requisition or on the form and select "Add to Favorites".
      View My Cart/Shopping Cart:


    Requisition:
     

    Form:
     

    1. Save the old form as a favorite to a Personal Folder.


    If successful, the user will receive a notification.


    1. Return to your shopping cart or requisition and remove the old form from the cart.
      Shopping Cart:


    Requisition: (click on the checkbox next to the form to be removed)


    1. Find your newly created favorite


    1. Add the favorite to your cart


    1. The new form is now using the most current version in CruzBuy.
      Note: If the current form contains new required fields that did not exist on the old form, the Requester will need to answer these fields before submitting the requisition.


    1. Delete the form favorite.


    Back to Top
  • Punch-Out Issue

    Some CruzBuy punch-out sites contain a combination of secure and non-secure content (i.e., Mix Content Blocker) that Firefox and Chrome browsers may block, preventing the punchout from displaying or working correctly. Users will need to disable the Mix Content Blocker to access these punchout suppliers.

    (Instructions based on FireFox v56.0 and Chrome v61.0.3163.100)

    To disable Mix Content Blocker in FireFox, go to the address bar and locate the “i” icon.


    Under “Secure Connection”, click on the “>” to access the submenu.


    Click “Disable Protection for Now”. Refresh screen if the page does not automatically load.


    In Chrome, click on the “Shield” icon on the right-hand side of the address bar and click “Load unsafe scripts”. Refresh screen if the page does not automatically load.

    ​​​
    Back to Top
There are no results.