Per Diem is one of the most complex expense items that can be added to an expense report in CruzFly. If you have questions about how to enter Per Diem expenses after reviewing this section, please contact
cruzfly-help@ucsc.edu. If you have questions about Per Diem, in general, please contact
travelhelp@ucsc.edu.
The Per Diem expense item is available in CruzFly for reimbursements for lodging and/or daily travel meals and incidental expenses for international travel, OCONUS (outside of the continental U.S.) travel, or domestic travel over 30 days. The maximum daily amounts populated in CruzFly are taken from federal per diem rate tables, such as the
U.S. Department of State for international travel or the
U.S. General Services Administration (GSA) for OCONUS and domestic destinations. These rates vary by date and destination and are updated regularly.
Per Diem can be found under the Travel expense type options. Per Diem is only available for travel expense reports with International or OCONUS (Outside of the continental US) destinations listed on the expense report header page, or for domestic travel over 30 days. Per Diem will not be available for expense reports where these conditions are not met. The Daily Meals expense type should be used for travel meals in the continental U.S. where travel is less than 30 days, or for specific meal purchases where a receipt is provided. Note that because Per Diem is for reimbursements only, University issued credit card items (OneCard or Instant Card Transactions) cannot be categorized as Per Diem and the Daily Meals expense type should be used instead.
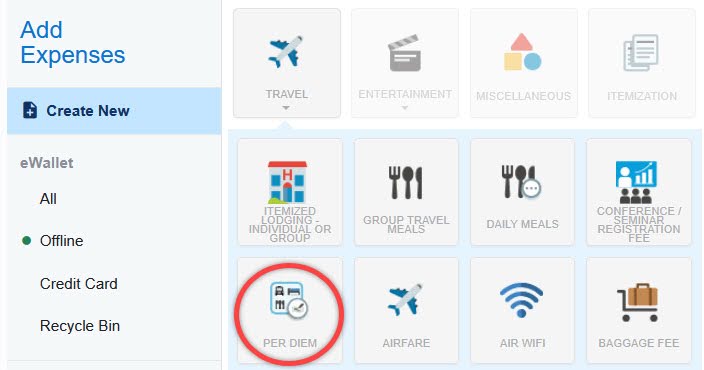
Entering Per Diem:
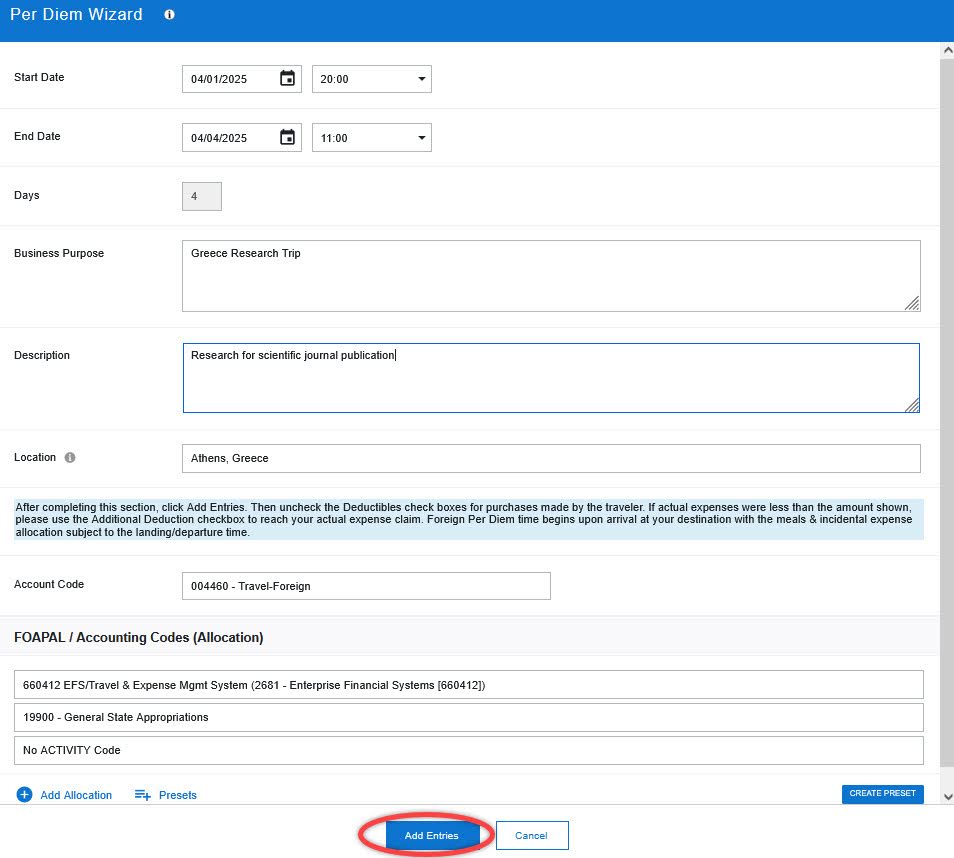
Begin by entering the details of your trip, including the dates, description, FOAPAL and destination of travel. The times associated with the Start and End Date should reflect actual arrival/departure times for your destination. The Description field is required to provide further details for your Per Diem claim. Once all information is entered, click
Add Entries at the bottom of the screen.
Next you'll see an individual line for each day of the Per Diem claim. The amount initially shown will include only the amount allocated for incidentals based on the location and travel dates entered. This initial amount can be adjusted to include your expenses.
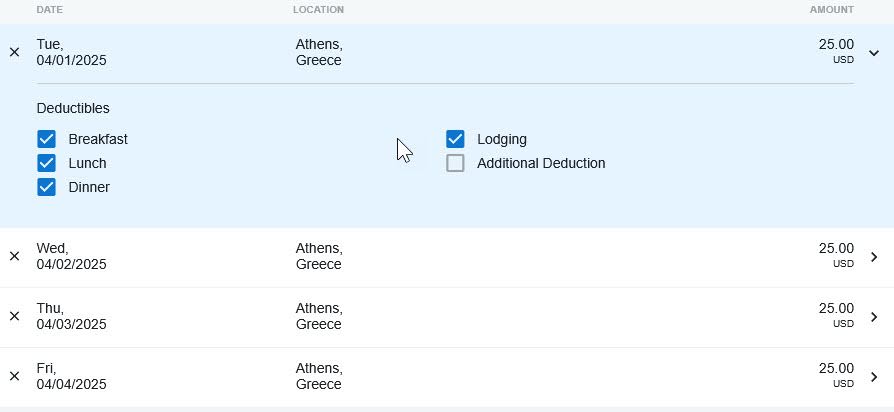
Click on each individual date to adjust the Per Diem amount by selecting which
Deductible items (such as breakfast, lunch, dinner, or lodging) were actually paid for. Click on each individual date and
UNCHECK the boxes of the Deductible items for the meals or lodging you are claiming for that day. By unchecking a box, you are adding that item’s Per Diem allowance (e.g., for a meal or lodging) to the total Per Diem amount for that day. This tells the system that you are requesting reimbursement for that portion of the Per Diem. When a Deductible box is checked, it indicates that you are not claiming that portion of the Per Diem allowance — for example, because the meal was provided at a conference or included with your lodging.
If all boxes are unchecked, the resulting amount being claimed is the maximum amount for lodging, meals, and incidental expenses based on the destination and dates of travel entered.
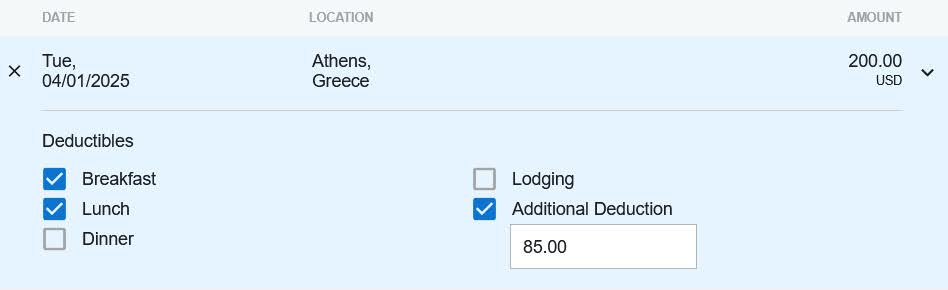
If the Per Diem amount calculated is greater than your actual expenses for that day, the
Additional Deduction checkbox should be used to decrease the total Per Diem amount being claimed. Entering an amount in the Additional Deduction field will reduce the amount being claimed by the amount entered.
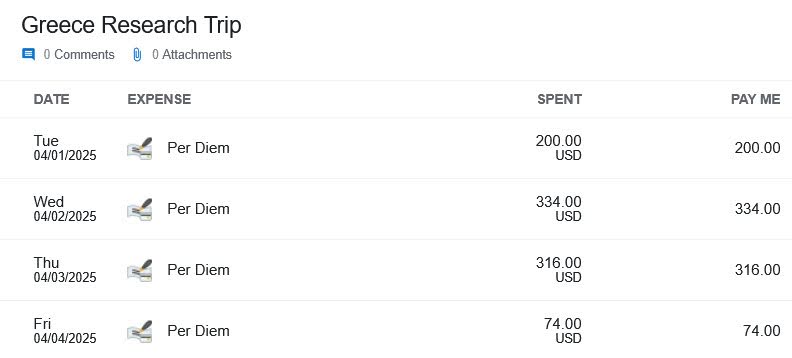
As an example, if you arrived at your destination in the evening and are only claiming dinner and lodging for the first day of travel, that would be entered as seen here, after unchecking the dinner and lodging Deductibles.

Note that only actual expenses for a day should be claimed. If your actual expenses for that first day were $200, and the system-calculated Per Diem amount is higher, enter the difference in the Additional Deduction field to reduce the requested amount down to $200.
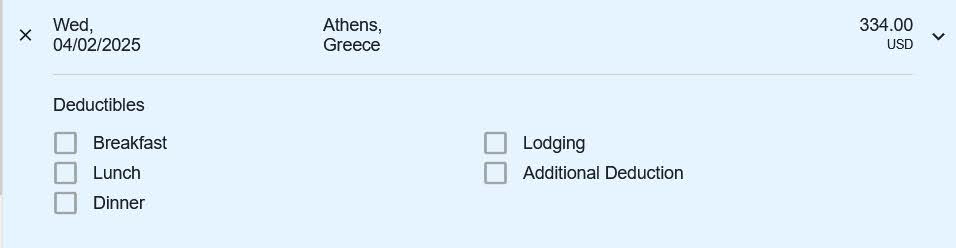
If on another date of the trip your actual travel expenses exceed the maximum Per Diem amount allowable for the date and destination, you may still only claim up to the maximum amount. This would appear in the system with all Deductible boxes unchecked, meaning the full allowable Per Diem is being claimed for that day. Note: The system will only calculate and allow reimbursement for the maximum Per Diem amount based on the destination’s rates. If your actual expenses exceed the Per Diem allowance, the amount over the maximum cannot be claimed.
For the final day of travel, lodging and any meals that were not purchased should be excluded and checked. For example: if a departing flight left the destination after lunch, that day’s Deductibles may be entered as seen here with only breakfast and lunch unchecked.

Once all amounts for the travel dates have been adjusted and are accurate, click
Add To Report at the bottom of the screen.

The individual Per Diem items will then be added to the expense report.